I have been using a Nest in my home for several years and always wondered why certain seemingly simple features are not available. Recently, I decided to take a look at the API to see if I could make them work myself!
Update April 3rd 2023 – Added a bit more information on temperature stability & dual-fuel/dual-stage setups & Nest leafs
Update Jan 25th 2023 – Took a look at some of the logs for seasonal savings, added a section for that
Update Dec 2nd 2022 – Data for a few weeks has been gathered but the seasonal savings also activated so tracking what that actually does for the next few days!
Original post Nov 14th 2022 – started taking a look and putting notes as they came up.
The Objective: – Setting the temperature in the right place at the right time
- I live in a 2-story home (plus a walkout basement) in Canada’s capital, Ottawa. Temperatures here are average high of 26.5 C in July and average low of -14.8 C in January with many days being above 30 C or below -30 C in each season.
- I have young kids who nap at various times during the day
- During the pandemic, I set-up my desk in the (unfinished) Basement
I first bought an extra sensor for the Nest and set it up in one of the kids bedroom to make sure the temperature would be comfortable at night and during naptime.
Problem 1 – Nest can only switch between the thermostat sensor and the external sensor at set times
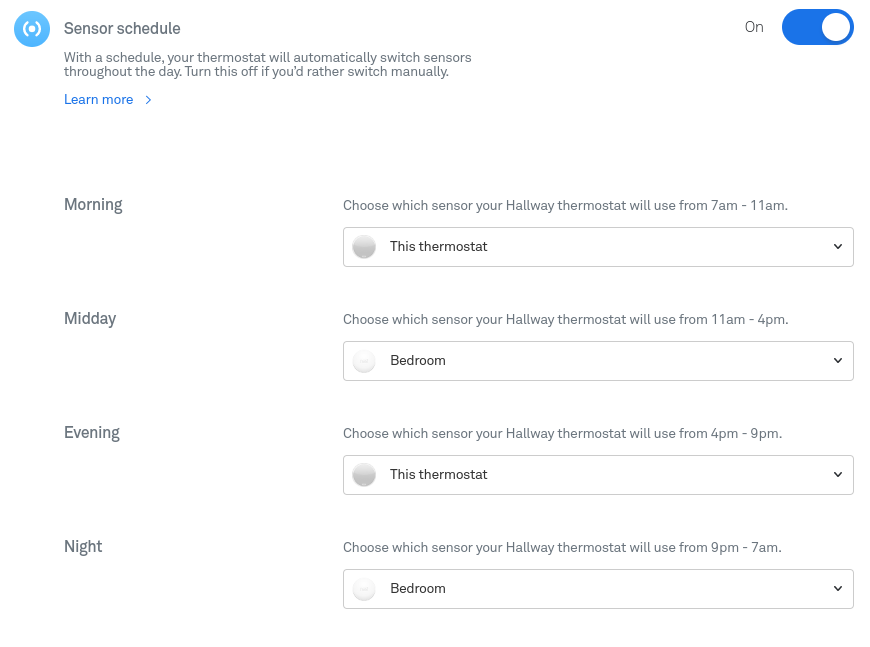
Well that’s super inconvenient! My kids don’t schedule their naptimes (or bedtimes) around this schedule at all! Plus young kids take multiple naps!
Ok, so my workaround was to use the schedule as in the screenshot and then tweak the nest temperature schedule to get the right temperature using the wrong sensor.
First step was to determine the typical difference between the bedroom and hallway sensor. (I did have to nail down some HVAC issues before getting here, the two sensors were many degrees apart and eventually I found the piping going to the bedroom was completely disconnected) Eventually though, I figured how to compensate and plugged it into the schedule. The difference in temperature is not quite the same in summer and winter though so some observations of the heating and cooling schedules/temperatures were needed to get it. It’s not ideal, but it sort of works.
Problem 2: Adding in a 3rd sensor?
So this worked pre-pandemic but now i’m working from home in the unfinished basement. So a 3rd sensor installed near my desk but it does not really fit in the schedule. Ideally I want the bedrooms until morning, then the main floor hallway sensor until I go downstairs to work, then bedroom for naptime, back to basement then hallway for lunch, back to bedroom, basement, hallway at end of my work day, and bedroom when kids go to bed. It’s quite a few changes but it really represents where people move in the house during the day. (in this case, when i’m in the basement, my wife and kids are upstairs… but it’s typically hotter there anyways so for most of the year where we heat, it would make everyone comfortable).
API Trials
OK so, clearly the standard Nest app doesn’t really help me out here since you can’t change the sensor switch times and they are less than ideal. So what about programming something myself using the API?
A bit of googling brought me to this: https://www.benlcollins.com/apps-script/nest-thermostat/ and after a bit of troubleshooting I got my version online. (reference https://developers.google.com/nest/device-access/traits )
Problem 3: Can’t access temperature sensor via API!
Ok so this seems to be pretty basic, but you can add a temperature sensor to your nest but you can’t actually access its data via the API! What the heck??
Well, technically, you can. After taking a look at my log, I noticed that whenever that sensor schedule changes (ie switch from the hallway to bedroom sensor), the API would spit out the current sensor’s temperature not just the nest device’s temperature. So you can indeed get the nest temperature sensor’s reading… if the nest is using that sensor when you read the data.
OK, since I can’t get the sensor’s data via the API, I figured maybe (it’s a longshot) but someone might have figured out how to connect to the sensor directly via bluetooth. Again, a bit of googling and https://www.ifixit.com/Teardown/Nest+Temperature+Sensor+Teardown/109956 we can see how the sensor is built but really, accessing it directly seems like a no-go (at least for my purposes).
Problem 4: but my Fan is ON?
So taking an initial look at the data, I noticed that my fan was listed as OFF. I run my furnace fan all the time to keep the temperature more even in the house. Basically I set Nest to run 60 minutes every hour.

So I went in nest app and set my fan to be on for the next 30 minutes (even though it is already on). And boom! it shows the fan as ON. So clearly, there is a bit of a problem with this. The API may be looking at the fan timer timeout (ie when the fan will stop) and that field is empty when you’re running the fan all the time but it did list a time when I forced it for 30 mins.
Problem 5: What kind of temperature accuracy are we looking at here?
So another thing that almost immediately popped into my mind was the accuracy of the temperatures spit out by the API. Seriously, take a look at what is being given:

From the sensor breakdown article, Levi commented that the sensor appears to be a TMP122. Now a bit of googling again to get the spec sheet out shows that the typical accuracy of this sensor (at 25C) is +- 0.1C with a max of +-0.5C. So basically, there are a lot of digits here which mean absolutely nothing. Unless there is another reason, for the data above, 21.3 and 20.9 would probably be just fine. Besides, I’m not sure anyone can perceive a 0.05 degree change and you can save in storage and data by not keeping all these digits that are way beyond your sensor’s accuracy.
Problem 6: What hysteresis?
An initial look at the setpoint and measured temperatures seems to indicate there is no hysteresis. Ie. As soon as the temperature drops below the setpoint, heating begins and as soon as the temperature passes the setpoint, heating ceases.
This is bad for constant cycling of your furnace, you typically want to wait a bit on either side so your furnace turns on and stays on for a little while so it doesn’t wear as quickly.
As mentioned in the sensor breakdown, the temperature sensor itself is within the nest temperature sensor with no direct access to the outside. So it would naturally have some hysteresis by physical design as there would be a lag for the sensor to heat/cool through the casing. I’m not sure if this was the intent.
There is also the possibility that there is some built in hysterisis but it’s just not showing up in the data.
Problem 7: Temperature too stable.
Again, taking a look at the data, the measured temperature seems way too stable. There are some instances where for 2.5 hours there is no change at all in the measured temperature (a reading every 5 minutes). As mentioned in problem 5, the output has a ridiculous amount of decimals which don’t move at all during this time. I’m not sure if that’s a bug in the API, or the data not refreshing for some reason but there is no way in my mind that I wouldn’t see at least a 0.1 degree difference in 2.5 hours (or even any of the extra digits through just random noise).
Something is going on with this temperature stability but I haven’t gotten around to figuring out what or why yet…
Update: After taking a look at some of the data, it does seem like there are some set points where there are significantly more readings and difference between the external temperature sensor (add-on) and the temperature sensor on the nest itself. The variation in the temperature readings on the nest is much better than on the external sensor despite having less readings.
External sensor readings (over 23000 readings):

The sensor readings from the nest sensor itself (over 11500 readings):

Clearly, the external sensor either does not have as much resolution or some other limitation.
The data itself is mostly focused in the 19-21 range which is where the scheduled setpoints are (except when in eco mode where it is 16). The external sensor has most of its readings at 19.2, 19.3, 19.7, 19.8, 20.2, 20.3, 20.7 and 20.8. If we take a look at it, its essentially two readings apart by 0.1C which go up 0.5. ie. 19.2, 19.7, 20.2, 20.7 (all increments of 0.5) & if we go 0.1C up, 19.3, 19.8, 20.3, 20.8 (all increments of 0.5). No idea why this is the case but it seems to correspond somewhat with the TMP122 sensor’s stated accuracy (+-0.1 max +-0.5). Is this somehow programmed in or is that just what the sensor outputs? no idea.
Problem 8: Setpoints and schedule
The setpoints don’t seem to correspond with the schedule in 2 ways.
Firstly, there’s again a crazy amount of decimals while the schedule I put in place is either 20.5 or 21 degrees. And second, it changes temperature from time to time by fractions of a degree. It may be adjusting for sun or others, but have not investigated yet. We very rarely actually touch the dial but it may also be a learned behaviour? Kind of a long shot but hard to explain. Here are screenshots of the schedule in the app, and the actual setpoints pulled from the Nest logger
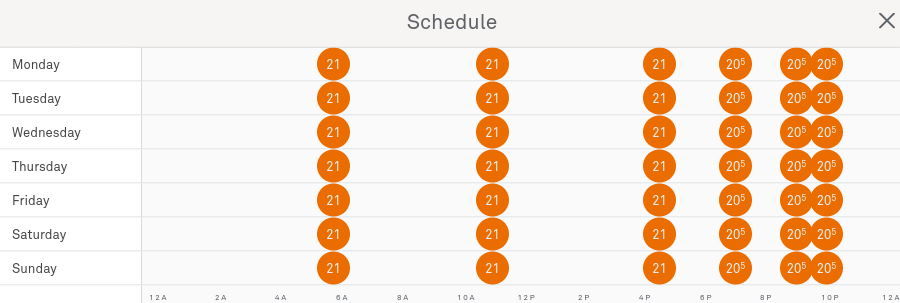

I find it very odd that there are some temperature variations on the actual setpoints when the schedule we put in does not. It should be set at 21C without interruption from 5:45 AM until 4:30 PM and then drop (gradually or at some point in between the two times) to 20.5C at 7:00 PM and stay there until 10:00 PM where it drops to 20C until the next morning at 5:45. I changed that last temperature setpoint to 20C but had not logged that data yet when I took a screenshot of the schedule.
Why does it change a bit in between those times, I’m not sure, like I said it could be compensations for sun or some turning of the dials we did in the past, although we rarely do touch it…
Problem 9: Dual Stage or Dual fuel?
When recently switching to a dual fuel heating system, I noticed that the data actually does not indicate anything with regards to stage or fuel source. The data just says “Heating” or “OFF” so there’s no way to know if the thermostat is triggering the furnace in stage 1 or stage 2 or, in a dual fuel system, which one is being activated.
Again, adding something like this should be fairly straightforward, it is very disappointing how these simple thing are not programmed into the API. Competitors do have this information (and an easy interface to extract the data).
(To Be Continued)
What does Seasonal Savings actually do?
A short while after I started tracking, the Nest thermostat’s seasonal savings popped on. So while the logger is not not 100% accurate it gives a good overview of what exactly this seasonal savings actually does. Starting for a few days before and extending a few days after (note there are some blips where the temperature was probably manually adjusted – after the seasonal savings and distortions where the logger was offline for a few hours) Each day you can see one cycle with the temperature dropping at night time and coming back up in the morning.

Frankly, this is a bit disappointing! What we see is basically the thermostat lowering the temperature during heating season. So Yes, it would bring savings if you don’t mind being a bit colder but it’s not really ‘smart’ or optimising anything.
What is disappointing is that there is no change in the actual temperature profile, the maximum and minimum temperatures are both just shifted down lower progressively. The shift in temperature is about 0.6 degrees C which corresponds to about 1 degree F. You can tell this was below some comfort levels with the blips in manually adjusted setpoints once the temperature was lowered. Here is a setpoint temperature profile of the first day and last day on the graph above (X axis is from midnight to midnight):

What I was expecting was a change in the temperature profile. One could presumably find some trends between the setpoint and the activation of the furnace and modify the setpoint to reduce unnecessary activation. During the day, the temperatures outside typically rise and with sunlight you expect the heating load to be less while at night it likely is more. Shifting the temperature profile a bit to keep a lower temperature at night longer and waiting a bit more in the morning before heating should have an impact. (Here the motion sensor data could help figure out when people are moving in the house, it wouldn’t capture movement in bedroom/getting ready, but you could estimate 15-30 mins prior). You could also presumably smooth out the transition between warmer and colder times to look more like ramps than step functions although that might just make the furnace cycle for no reason. The point is however, that this seasonal savings adjustment seems like it could be further optimised, it might be good marketing but it doesn’t seem like it does all that much! (Although it might actually be the simplest easiest way to do things, it is possible that further optimisations are too difficult especially with a wide range of houses builds/configurations and heating system designs)
What is a Nest Leaf, how do you get them and what do they mean?
You probably saw nest leafs being awarded but what do they mean? Essentially you get a nest leaf whenever your temperature setpoint is at a more efficient temperature then what it usually is set at, or if it is below a certain value for heating (16.5C/62F) or above a certain value when cooling (29C/84F) (you automatically get one if your thermostat reverts to eco temperatures since they are below/above those values).
The idea is basically to get people to reduce their energy consumption by decreasing the heating and the cooling they use. If you always have temperatures outside the limits you get leafs every day. The first year you have a nest, it is quite easy to get a leaf as you likely will be at more eco-friendly temperatures then the internal setpoint. The following years, you would need to change to even more eco-friendly temperatures to get leafs.
However it looks like if you set one of those temperatures on your schedule (even for a short time) you get a leaf too. So you can pretty easily “cheat” the system and get some leafs when you’re not too energy efficient. If you set up the home/away assist, it also seems to set it down to eco-temperatures and get you some leafs. This also means that the reports you get every month don’t mean that much, being the top X% in nest thermostat users in your area might not mean you (or others) have more eco-friendly temperatures.
Tips/things learned:
- Taking a look at the sensors periodically can help identify insulation or HVAC issues in different rooms
- Increasing the insulation in the attic (approx R32 to R60) reduced the difference between the bedroom and the thermostat by about 1 degree in both summer and winter
- Adding a cold air return in the basement near the floor (vs the one on the ceiling) made a big difference in temperature difference
- Keep the furnace fan ON to keep a more even temperature (provided your furnace has multiple fan speed settings for this purpose)
Leave a Reply